How to replace your Bell MTS residential gateway 3800HGVB with a 5168N
Ce service est offert uniquement aux clients de MTS au Manitoba. Afin d’obtenir le soutien relatif à votre région, veuillez sélectionner votre province.
How to replace your residential gateway Bell MTS 3800HGVB with a 5168N - Internet Service - Copper
-
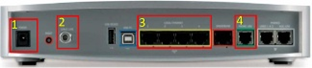
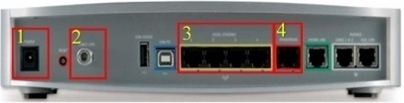
Disconnect the cables in sections 1, 2 and 3 on your current 3800HGV-B.
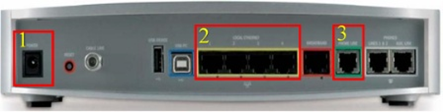
Images may not be exactly as shown
-
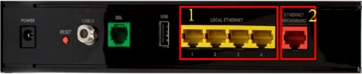
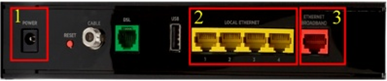
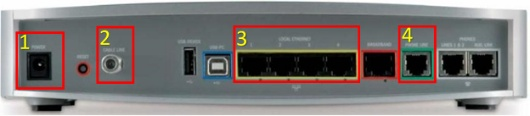
Connect the corresponding cables into sections 1 and 2 on your new 5168N.
-
Ethernet cables can be connected to any Local Ethernet port (section 2).
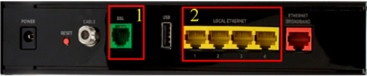
Images may not be exactly as shown
-
-
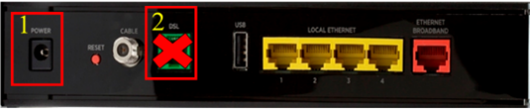
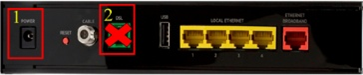
Connect the power adapter included in the box to the power port (section 1) on your new 5168N.
Note: The Ethernet Broadband port (section 2) is not used in this configuration.
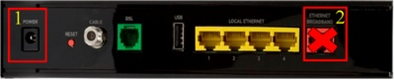
Images may not be exactly as shown
-
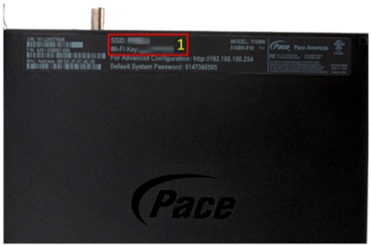
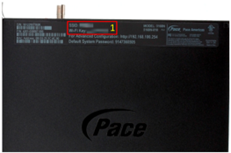
Ensure that you write down the new wireless credentials which are located on the side of the 5168N (section 1). The SSID refers to the new Wireless Network name that you will be connecting to and the Wi-Fi Key is the new wireless password that you will be using.
- If you are using Bell MTS Whole Home Wi-Fi Pods continue to connect to the same Wireless Network name as you did prior.
- If you need help with your Wi-Fi connection, click here.
-
If you need help connecting your mobile device, visit Using your Device.

Images may not be exactly as shown
How to replace your residential gateway Bell MTS 3800HGVB with a 5168N - Internet Service - Fibre
-
Disconnect the cables in sections 1, 2 and 3 on your current 3800HGV-B.
- Avoid mixing up the Ethernet cables in sections 2 and 3.
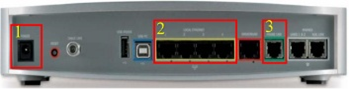
Images may not be exactly as shown
-
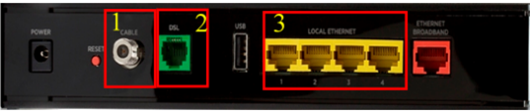
Connect the corresponding cables into sections 1 and 2 on your new 5168N.
- Ethernet cables can be connected to any Local Ethernet port (section 1).
Images may not be exactly as shown
-
vConnect the power adapter included in the box to the power port (section 1) on your new 5168N.
Note: The DSL port (section 2) is not used in this configuration.
Images may not be exactly as shown
-
Ensure that you write down the new wireless credentials which are located on the side of the 5168N (section 1). The SSID refers to the new Wireless Network name that you will be connecting to and the Wi-Fi Key is the new wireless password that you will be using.
- If you are using Bell MTS Whole Home Wi-Fi Pods continue to connect to the same Wireless Network name as you did prior.
- If you need help with your Wi-Fi connection, click here.
-
If you need help connecting your mobile device, visit Using your Device.
Images may not be exactly as shown
How to replace your residential gateway Bell MTS 3800HGVB with a 5168N - TV Service - Copper
-
Disconnect the cables in sections 1, 3 and 4 on your current 3800HGV-B.
-
If there is a coaxial cable in the cable port (section 2) unscrew it.
Images may not be exactly as shown
-
-
Connect the corresponding cables into sections 2 and 3 on your new 5168N.
- Ethernet cables can be connected to any Local Ethernet port (section 3).
-
If you have a coaxial cable connect it to the cable port (section 1).

Images may not be exactly as shown
-
Connect the power adapter included in the box to the power port (section 1) on your new 5168N.
-
Note: The Ethernet Broadband port (section 2) is not used in this configuration.

Images may not be exactly as shown
-
-
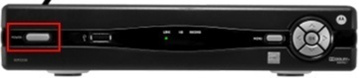
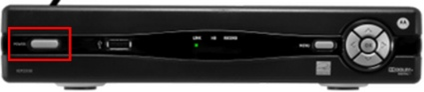
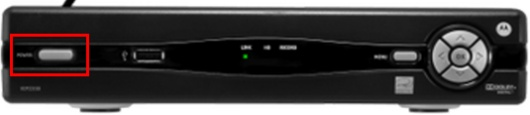
Go to each individual set-top box, starting with the PVR (VIP1216, VIP2262 or VIP5662). Press and hold the Power button (section 1) for ten seconds. This will reboot (power cycle) the set-top box.
Images may not be exactly as shown
How to replace your residential gateway Bell MTS 3800HGVB with a 5168N - TV Service - Fibre
-
Disconnect the cables in sections 1, 3 and 4 on your current 3800HGV-B.
- Avoid mixing up the Ethernet cables in sections 3 and 4.
-
If there is a coaxial cable in the cable port (section 2) unscrew it.
Images may not be exactly as shown
-
Connect the corresponding cables into sections 2 and 3 on your new 5168N.
- Ethernet cables can be connected to any Local Ethernet port (section 2).
-
If you have a coaxial cable connect it to the cable port (section 1).
Images may not be exactly as shown
-
Connect the power adapter included in the box to the power port (section 1) on your new 5168N.
Note: The DSL port (section 2) is not used in this configuration.
Images may not be exactly as shown
-
Go to each individual set-top box, starting with the PVR (VIP1216, VIP2262 or VIP5662). Press and hold the Power button for ten seconds. This will reboot (power cycle) the set-top box.
Images may not be exactly as shown
How to replace your residential gateway Bell MTS 3800HGVB with a 5168N - Internet and TV Service - Copper
-
Disconnect the cables in sections 1, 3 and 4 on your current 3800HGV-B.
-
If there is a coaxial cable in the cable port (section 2) unscrew it.
Images may not be exactly as shown
-
-
Connect the corresponding cables into sections 2 and 3 on your new 5168N.
- Ethernet cables can be connected to any Local Ethernet port (section 3).
-
If you have a coaxial cable connect it to the cable port (section 1).
Images may not be exactly as shown
-
Connect the power adapter included in the box to the power port (section 1) on your new 5168N.
Note: The Ethernet Broadband port (section 2) is not used in this configuration.

Images may not be exactly as shown
-
Ensure that you write down the new wireless credentials which are located on the side of the 5168N (section 1).The SSID refers to the new Wireless Network name that you will be connecting to and the Wi-Fi Key is the new wireless password that you will be using.
- If you are using Bell MTS Whole Home Wi-Fi Pods continue to connect to the same Wireless Network name as you did prior.
- If you need help with your Wi-Fi connection, click here.
-
If you need help connecting your mobile device, visit Using your Device.
Images may not be exactly as shown
-
Go to each individual set-top box, starting with the PVR (VIP1216, VIP2262 or VIP5662). Press and hold the Power button (section 1) for ten seconds. This will reboot (power cycle) the set-top box.
Images may not be exactly as shown
How to replace your residential gateway Bell MTS 3800HGVB with a 5168N - Internet and TV Service - Fibre
-
Disconnect the cables in sections 1, 3 and 4 on your current 3800HGV-B.
- Avoid mixing up the Ethernet cables in sections 3 and 4.
-
If there is a coaxial cable in the cable port (section 2) unscrew it.
Images may not be exactly as shown
-
Connect the corresponding cables into sections 2 and 3 on your new 5168N.
- Ethernet cables can be connected to any Local Ethernet port (section 2).
-
If you have a coaxial cable plug it in the cable port (section 1).
Images may not be exactly as shown
-
Connect the power adapter included in the box to the power port (section 1) on your new 5168N.
Note: The DSL port (section 2) is not used in this configuration.
Images may not be exactly as shown
-
Ensure that you write down the new wireless credentials which are located on the side of the 5168N (section 1).The SSID refers to the new Wireless Network name that you will be connecting to and the Wi-Fi Key is the new wireless password that you will be using.
- If you are using Bell MTS Whole Home Wi-Fi Pods continue to connect to the same Wireless Network name as you did prior.
- If you need help with your Wi-Fi connection, click here.
-
If you need help connecting your mobile device, visit Using your Device.
Images may not be exactly as shown
-
Go to each individual set-top box, starting with the PVR (VIP1216, VIP2262 or VIP5662). Press and hold the Power button (section 1) for ten seconds. This will reboot (power cycle) the set-top box.
Images may not be exactly as shown